Labs
We are delighted that you will try your hand at Cybersecurity in Context’s labs. Here you will find instructions on downloading the 1) virtual machine software, the 2) image that contains the labs, and 3) logging into the VM.
Even if you have not bought the book, you are free to use these labs!
If this is new to you, this is what we are doing:
- You are going to install a special, separate operating system on your computer, known as a virtual machine. The virtual machine, or VM, will run atop your regular operating system (Mac or Windows) and will not affect it.
- You will use special software, the VMWare, to access this VM. VMWare will “boot up” the VM and you’ll have a virtual computer running Kali Linux running atop your regular operating system.
- The setup is a three-step process.
1) GETTING VMWARE WORKSTATION OR FUSION
You will need VMWare Workstation 17.5 or later (for Windows and Linux) or VMWare Fusion 13.5 (Mac, either Apple Silicon or Intel) installed to use the VMs for Cybersecurity in Context.
Using a “virtual machine” for your lab work will ensure that your computer will not be harmed by any of your experimentation. The software creates a “virtual” computer atop your regular operating system. Commands you use will only affect the virtual computer and not your own data. Virtual machines are widely used in computer security for testing and forensics.
Broadcom now owns this software and they require you to create an account. You can download the appropriate version here:
https://blogs.vmware.com/teamfusion/2024/05/fusion-pro-now-available-free-for-personal-use.html
Attention Berkeley students: the campus has an academic license and download here: https://software.berkeley.edu/vmware
2) DOWNLOADING THE VM and Labs
The first step is obtaining an ssh key from our website that is
required for authentication with our server.
You can download the key here: cic.zip
Unzip the file. The key is named cic (no extension).
If you are using a Mac, change the permissions on cic with chmod.
To do this, open a terminal window (Terminal or iTerm2 on the Mac, cmd.exe on Windows, or the Linux terminal on Linux).
To quickly find Terminal on a Mac, press Command+Spacebar. This will open “spotlight search.” Type Terminal.
To quickly find Terminal on a PC, press Start and search for Command Prompt or PowerShell

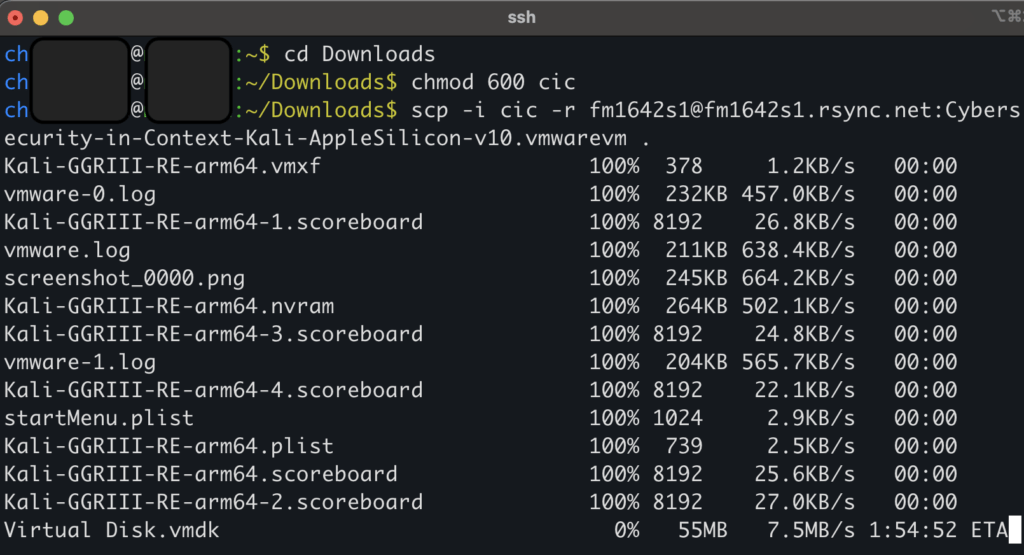
Chances are, the cic file will be in your downloads directory. Thus, in Terminal you will have to “change directory” to Downloads/, like so.
cd DownloadsAfter you move Terminal to the correct directory, use the chmod command
chmod 600 cicYou can download the VM for the book using either a download manager
like Putty or FileZilla, or by using the command line on your Mac,
Windows, or Linux machine. We prefer the command line. 🙂
Command Line Option
To download using the command line:

- Open a terminal window (Terminal or iTerm2 on the Mac, cmd.exe on Windows, or the Linux terminal on Linux).
- To quickly find Terminal on a Mac, press
Command+Spacebar. This will open “spotlight search.” TypeTerminal. - To quickly find Terminal on a PC, press Start and search for
Command PromptorPowerShell - Change directory to the location of the file
cic. If you use a Mac, it is likely to be in your downloads folder. - Type the following command to download the VM for Apple Silicon (M1/M2/M3/etc.) computers (be sure to include the dot at the end):
scp -i cic -r fm1642s1@fm1642s1.rsync.net:Cybersecurity-in-Context-Kali-AppleSilicon-v16.vmwarevm .- Type the following command to download the VM for Intel-based computers (older Macs, Windows, Linux)(be sure to include the dot at the end):
scp -i cic -r fm1642s1@fm1642s1.rsync.net:Cybersecurity-in-Context-Kali-Intel-v16.vmwarevm .The labs for the book are contained in the Labs folder in the VMs, but
you can also download them separately by accessing the Labs folder
on rsync.net.

To download only the Labs, type the following command in your terminal:
scp -i cic -r fm1642s1@fm1642s1.rsync.net:Labs .The cic specified above is the key file you downloaded. If you
saved it somewhere other than the current directory, type the full
pathname after -i, for example:
scp -i ~/Downloads/cic -r fm1642s1@fm1642s1.rsync.net:Labs .Note that the labs are designed to work with the Linux environment
we’ve created in the VMs–to use the labs in a different Linux
environment, you may have to install additional software or do some
configuration. We can’t offer support for using the labs outside the
VMs.
SFTP Option
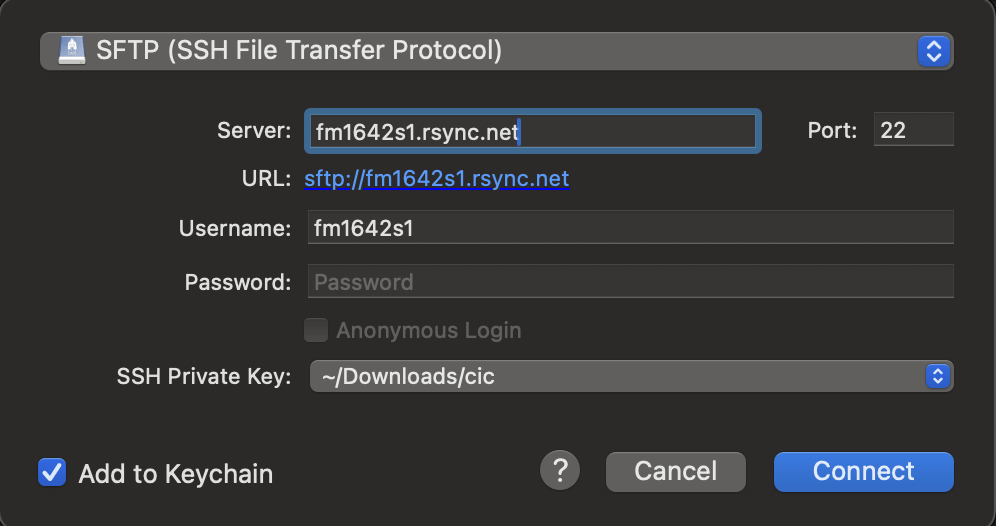
To use this option, you will need FTP software, such as WinSCP (Windows) or CyberDuck (Mac).
To download using a download manager, establish an SFTP connection to
the site fm1642s1.rsync.net
Choose “key file” as the authentication mechanism.
Use the username fm1642s1 and the file cic (which you downloaded above) as the key file. The password field will be blank. The file cic is a private key that serves as the password.

When you connect to the server, you will see three folders:
Cybersecurity-in-Context-Kali-AppleSilicon-v16.vmwarevmCybersecurity-in-Context-Kali-Intel-v16.vmwarevmLabs
If you have an Apple Silicon-based Mac (M1/M2/M3/etc.), download the folder: Cybersecurity-in-Context-Kali-AppleSilicon-v16.vmwarevm
This VM contains a copy of the labs in the “Labs” folder.
If you have an Intel-based Mac, Windows, or Linux computer. This VM
contains a copy of the labs in the “Labs” folder, download the folder: Cybersecurity-in-Context-Kali-Intel-v16.vmwarevm
Download the “Labs” folder to obtain only the Microsoft Word versions
of the Cybersecurity in Context labs.
BUYING A THUMBDRIVE CONTAINING THE VMs AND LABS
Downloading the VMs will take a long time unless you have a fast
Internet connection. We also offer the VMs and labs on a custom
USB thumbdrive. This can be ordered TKTK
3) LOGGING IN TO THE CYBERSECURITY IN CONTEXT VMs
Open either VMWare Workstation (Windows / Linux) or VMWare Fusion
(Mac).
Then use File–>Open to open the appropriate VM. The VM file will be called: Cybersecurity-in-Context-Kali...vmwarevm
Start the VM and then use user as the username and 9korner9 as the password.
Both username and password are lowercase.
Enjoy the journey!